
Rediware Software's
Renamer version 3.0
copyright 2001, 2002 Rediware
Software and Services
areas of this document
introduction and purpose conventions in this document application screenshot installation uninstalling
the text and tool menus the instruction operations additional notes credits and rights
other areas of the application what is needed to run Renamer errors contacting Rediware
Software selecting files to rename unexpected results can I? UPDATES Renamer is now trialware
Rediware Software's Renamer was designed to rename multiple files at one time. Files are normally renamed by selecting the file, right-clicking it, selecting 'rename' from the popup menu, highlighting the portion of the name you wish to change, and typing in the new portion. This is OK for one or two files, but if you have to rename many files, it can become quite tedious.
Why would you have to rename multiple files? Perhaps you don't. I find that I do quite often. I design textures for my cad and drawing programs, I create graphics for my website as well as for other sites, and I like to store specific files, like graphics, in some type of sequential order. If you have a similar need, this program may be for you.
I have prepared many help files in the past, and it seems that they all evolve into their own format somehow. This help file has been created as a web page. By doing this, I hope to make it more interactive, and therefore easier to use.
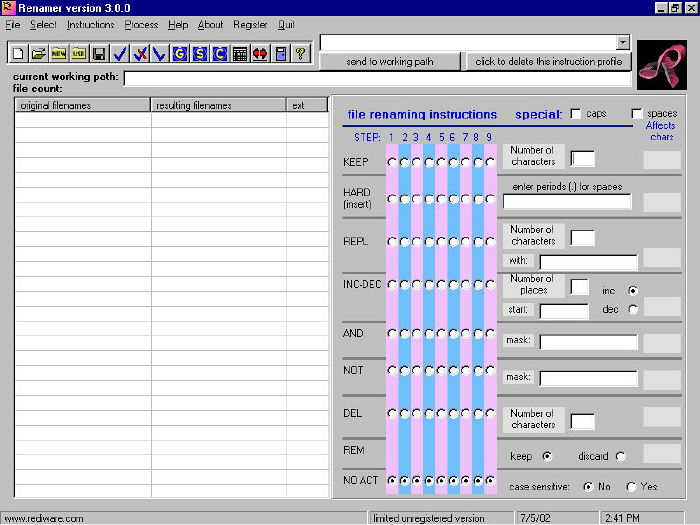
Below is a screenshot of Renamer. Click any hotspots (cursor turns to a hand) to find about that specific topic. Click any link to read information the link describes. Don't forget to read the additional notes.
Concept: Load a set of files (filenames - maximum 500 at a time or 2000 at a time depending on method) into Renamer. Enter a set of instructions that will change the names of the files. (up to 9 instructions) Process the files and view the results. If they are satisfactory, save (rename) the files. top of page screenshot
Installation: Install Renamer 3.0 as you would any other application, doubleclicking the 'setup.exe' file. If you are upgrading from a previously installed version of Renamer, uninstall that version first before installing this one.
Uninstalling: Uninstall Renamer
in the normal way. Using your Control Panel, doubleclick Add/Remove Programs.
Scroll down in the resulting window to 'Renamer'. Select it and then click
the uninstall button. Renamer 3.0 differs from previous versions of Renamer
in that it creates it's own files (your saved instructions, for example).
Using Add/Remove to uninstall Renamer will not remove these created files.
To completely remove Renamer 3.0, uninstall first as described above. Then
navagate to the folder where Renamer was installed on your hard drive and
remove all folders and subfolders. (delete the folder called renamer)
top of page screenshot
Active links (with Microsoft Internet Explorer) are underlined and in blue.
Main topics are large and are green.
Menu headings (the headings you see) are red and bold.
Submenus (dropped down from the main menus) are orange.
Toolbox buttons are either red or orange, depending on where they reside in the text menus (main or sub).
Checkboxes (Caps and Spaces) options are purple.
Instruction names (explanations follow) are brown. top of page screenshot
Renamer has been tested on Windows 98 and Windows 95 operating systems. Renamer will NOT run on any operating system older than Windows 95, due to the fact that Renamer is a 32 bit application. Renamer takes little operating space, and therefore should run on older systems with small amounts of memory.
Renamer was written with a resolution of 800 x 600. If your system is set to a smaller resolution, you will not be able to view the entire screen.
These documents were written with the intent of being run with Microsoft Internet Explorer. It functions properly with IE 5.0 and above. Top of page
This screenshot is interactive. Click on any active portion of the picture to take you to the text describing that area. Note this document has been completely updated for version 3.0. See UPDATES at the bottom of this doc to see what was updated on each version.
NEW: Causes processed (resulting) filenames to be blanked out. Use this when you wish to apply a different set of instructions to your filenames but wish to keep the original filenames loaded.
OPEN: Opens the dialog box to select new files for renaming. Select the files you want to rename in this mode. By using OPEN, you blank out any filenames previously loaded.
FOLDER - NEW: Opens the dialog box to select a NEW folder. After a folder is selected, all files in the folder will be imported into Renamer automatically. By using FOLDER - NEW, you blank out any filenames previously loaded.
FOLDER
- USE: (or, "use the displayed path") Opens the folder that
is displayed in the current working path. After selecting,
all files in the folder will be imported into Renamer automatically. By using
FOLDER - USE, you blank out any filenames previously loaded.
Because the current working
path is saved along with any instruction sheet, you can use this feature to
save pathnames to the folders you use often. To do this, use the FOLDER-NEW
icon to navigate to your favorite working folder. Then save the instruction
sheet. The next time you want to use that folder, GET the instruction sheet,
which will display the path in the 'current working path' box. Then click
FOLDER-USE to automatically load in the files that exist in that folder.
SAVE:
Selecting SAVE will rename the file(s) (in the original filenames column)
with the name(s) in the adjacent column (resulting filenames column). The
extension to the filename will be retained. Renamer does not allow for changing
the extensions.
Added to the save routine are some comprehensive
error routines. In previous versions, certain errors would halt the renaming
process and leave it incomplete. There are three main issues that the save
command will handle gracefully. Two of the three issues will notify you of
the specific issue and you will be given a chance to continue or abort. The
third will just give you a notification. In all cases the offending filename
will become unchecked. These issues are:
1. The resulting filename (after 'process')
yields a blank filename. Choosing to continue will proceed with all filenames
not affected, and uncheck the offending filename.
2. The resulting filename becomes equal to another
filename in the list, which would result in a duplicate filename. Choosing
to continue will uncheck the first filename of the duplicate and rename the
remaining files.
3. The resulting filename becomes equal to another
filename in the selected folder but was not chosen to appear in the list,
which would result in a duplicate filename. Choosing to continue will uncheck
the offending filename and rename the remaining files.
In all cases, you may choose not to continue,
edit the offending filename manually, recheck it, and then attempt another
save. To edit a resulting filename in the 'resulting filenames' column, click
it once to select it, and then click it again to edit it. If a cursor does
not appear ready to edit the filename, try clicking a bit slower.
EXIT: Closes the application and exits. (icon labeled Quit) top of page screenshot
ALL SELECTED : The checkboxes that will appear in the 'resulting filenames' column when filenames are laoded designate which files are to be processed. Click Select-All to check all the boxes that have filenames loaded for that row.
NONE SELECTED : Click Select-None to uncheck all the checkboxes at one time.
REVERSE SELECTED : Reverse the checked items - uncheck all that are currently checked and check all that are currently unchecked. Top of page screenshot
RENAME: Select process files when you have all your instructions for renaming the files entered. Process does NOT save your new filenames, nor does it even rename them. It processes them so that you can see what the renaming result will be in the 'resulting filenames' column before saving.
CALC AFFECTS CHARS: After entering instructions, select this to see which characters in your original filename will be affected.
CLEAR: Clear all the instructions you have entered and sets the entire instruction box 'to zero.' Use this if you wish to start over in your instruction entry. This is the icon labeled "C".
GET: If you have saved a set of instructions previously, you can retrieve them with the GET command. This icon is labeled "G". You will be able to select from a list of previously saved sets.
SAVE: After carefully creating a set of instructions you may wish to use them again. To do so, simply save them using the SAVE command. This icon is labeled "S". You will be requested to give this particular set of instructions a name when saving. After saving, these instructions can be recalled with the GET command.
HELP:Select help to view this file at any time. Note that all the links work in this file if you use Microsoft Internet Explorer (4? and above) but I have found that the links do not work correctly using Navigator. The file will still be readable, but it does not link properly.
ABOUT:Selecting about will result in a window displaying the current version of Renamer and an option to see your computer system information.
REGISTER:To register Renamer, click this option while Renamer is running. You will be presented with two sub-options:
REGISTRATION FORM : Select this to display the registration form in Wordpad. All registration instructions are included on the form. Enter your name and e-mail address on the form and print it out. Send the form and a check or money order for $10.00, following the instructions on the form. Send it to the address listed on the form. As soon as your payment is received, you will receive an e-mail with your registration code.
ENTER REGISTRATION : When you receive your registration code via e-mail, select the ENTER REGISTRATION option. A form will appear. Enter your name, e-mail address and registration code exactly as written in your received e-mail. Click the button to accept the registration and Renamer will become complete!
CAPS
and SPACES checkboxes: If the Caps
checkbox is checked when the process button is clicked, Renamer will make
sure that the first letter in all words in a filename are capitalized.
This is useful for renaming song titles which will be used to print out labels
for CDs, etc. (using software that can create labels using the names of the
files). Note that the Caps checkbox
function is processed after all the other functions have been performed.
If
the Space checkbox is checked when the
process button is clicked, Renamer will remove any spaces in your filename.
This is valuable for renaming files that will be used on web sites since standard
naming conventions call for no spaces. Note that the space checkbox function
is processed after all the other functions have been performed.
NOTE that the Caps function is performed
BEFORE the Space function if BOTH are checked.
Other areas of the application:
CURRENT WORKING PATH: After selecting files for renaming, this box will show your current path for those files. When selecting files, do not change directories unless you wish to select other files instead. ALL FILES SELECTED MUST RESIDE IN THE SAME DIRECTORY. Do this beforehand. Renamer only keeps track of one path. You cannot edit the current path. This is a display only. Top of page screenshot
PATH LIST BOX: This is a dropdown list box. This box is empty when Renamer is first installed. When you begin to save instruction sets, this list box will contain all the pathnames that the instruction sets point to. For example, you may have saved an instruction set and called it 'images'. The working path that images pointed to was 'C:\myfiles\myimages\'. In this case, 'C:\myfiles\myimages\ will be one of the items in this list box. Click the down arrow to view all of the pathnames you have previously saved. Then.....
SEND TO WORKING PATH button: When a path is displayed in the PATH LIST BOX, clicking this button will copy the path over to the actual current working path. Now you can click the FOLDER-USE icon to automatically load filenames from the displayed folder path. This is similiar to the GET (instructions). The difference is that GET lets you pick from the stored instructions filenames and the LIST BOX / SEND TO set lets you select from the path names you used for each instruction set.
CLICK TO DELETE THIS INSTRUCTION PROFILE button: After saving instrustion sets, you may wish to delete some if you do not have a need for them anymore. This button allows you to delete an instuction set that is displayed in the LIST BOX. After clicking this button you will be required to verify the deletion, and you will be presented with the pathname and the instruction set name before verifying. If this is the set you wish to delete, verify (click 'yes' on the popup box) and the removal ofthis set will take place.
FILE COUNT display: This simply displays the number of file names loaded onto the display area.
CHECKBOXES: (in
the "resulting filenames" column - not visible in the screnshot)
Checkboxes can be checked or unchecked. When filenames are loaded, they are
all checked by default. If a box is checked, it's corresponding filename will
be processed when PROCESS is selected. The filename will also be saved (the
file will be renamed) if the box is checked. If the box is unchecked, this
filename will not be processed, nor will the original file be changed. Note
that in version 3 of Renamer, the checkboxes only show up if filenames have
been loaded. They do not show up on the current screenshot (above) because
of this. The checkboxes now reside beside in the "resulting filenames"
column instead of the "original filenames" column.
Top of page screenshot
ORIGINAL FILENAMES column: This will display the names of the files you have selected. This display will not change, unless you decide to select different files to process.
RESULTING FILENAMES column: After entering instructions in the instructions area, select PROCESS. The resulting new filenames will be in the 'resulting filenames' column for your inspection.
EXTENSIONS column: This just displays the filename extensions. They cannot be modified. When a file is renamed (by saving), the extension will remain the same. Top of page screenshot
INSTRUCTIONS: This box contains instructions that you will enter to change the filenames. You may from one instruction to nine instructions. The instructions will be carried out starting at step 1 and finishing at step 9. Each instruction is different, allowing you to combine instructions for complex results. Some instructions you may never use. Decide which ones you need and enter them only. See 'The Instruction Set' below.
STEP SELECTION: For each step you wish to use, click the option box in the appropriate column (step 1 in the first column, step 2 in the second column etc.) in the same row that contains the instruction you wish to carry out. For example, if you wanted step 2 to delete some characters, you would click the option selection in the 2nd column, and the 7th row down in that column. Note that the 8'th row (NO ACT) means no action. If you decide to take a step out or the operation, just click that option for that step. Note that you can use the same instruction for different steps (although the instruction will be the same as the first time it was executed. You can also skip steps. (example: you can enter instructions for 1,3, and 7th steps if you want) The only rule is, the steps will be processed from 1 to 9. If that step is deactivated (NO ACT) or there is no instruction for that step, Renamer will continue on. Feel free to mix and match!
Has no function other than to animate and be cool. Top of page screenshot
REGISTER STATUS: This area will either display 'limited unregistered version' or 'full registered version'. After registering, you will have the full registered version. To find out how to register Renamer 3.0, click here.
For all instruction sets, click the option that intersects the set (row) you wish to activate and the step number (column) you wish that instruction to have. All instructions are carried out in order from step 1 to step 9. Designating which instruction is carried out first, second, third, etc. will change the ending result.
Instructions are carried out on the number of characters you designate, or the length of the strings you enter. The next instruction begins it's calculations on the next character in line. For example, if you enter the first instruction to KEEP 4 characters, and you enter the second instruction to DELete 2 characters, characters 1,2,3 and 4 will be kept, while characters 5 and 6 will be deleted. The following (third in this example) instruction will affect the seventh character. You can see that if you reversed the steps, your end result would be different. Keep this in mind as you experiment with Renamer.
If there aren't enough characters to complete the instruction for some or all filenames, the instructions will be carried out as far as they are able with the available characters.
If a resulting filename ends as a blank (no characters), that filename will not be changed, and the checkbox will automatically become unchecked.
After your instructions have been completed, you can edit the resulting filenames directly before saving. This will help when only a few names didn't turn out as you expected. To edit a resulting filename in the 'resulting filenames' column, click it once to select it, and then click it again to edit it. If a cursor does not appear ready to edit the filename, try clicking a bit slower. Top of page screenshot
The instructions themselves: Note: in the following text, the phrase 'internal pointer' refers to the pointer in the software that points to the next character that will be affected by the next instruction.
KEEP: Select which step (1-9) this will be. Enter the number of characters you wish to keep. This instruction will move the internal pointer to the character after the last character kept, which means the next step will begin operating on character number 'number of characters' + 1.
HARD
(insert): Designate which step this is to be. Enter the characters
you wish to insert into the new filename. The internal pointer does not move
for this instruction.
Note: If you wish to use spaces in your filenames,
enter periods in this field. Renamer will convert them to spaces when they
are actually used. This means, of course, that you cannot use periods in your
filenames. (Why would you want to anyway?)
REPLace: Select which step number. Enter the number of characters you wish to replace. That number of characters will be deleted. Enter the characters you wish to do the replacing. Those characters will be added to the end of the new filename so far. The internal pointer will move the number of characters being replaced. Top of page screenshot
INC-DEC: Select the step number. This is a numeric counter. Use the option to either have the counter increment or decrement. Enter the starting number. Enter the number of places. The number of places is actually the number of digits. If you enter to start at 6, and enter the number of places as 3, the counter will insert 006, 007, 007 etc. (if INC was selected) or 006, 005 004 (if DEC was selected) into your new filename. Each file that is checked will be renamed incrementally. The internal counter is not moved.
AND: The AND operator is normally used for numbers and not strings. However, AND is used with strings here. Select the step number. Enter the mask. The mask is a string you wish to compare with the characters in the original filename. The resulting addition to your new filename will be any characters that are the same in the original filename and the mask. This instruction compares characters position for position. (the first character in the original filename gets compared to the first character in the mask, second to second, etc.) If your original filename is RENAMER and your mask is eeeee and the internal pointer is at 2 (pointing to the second character), the AND instruction will result in 'eer' being added to the resulting filename. The internal pointer moves the number of characters in the mask. Top of page screenshot
NOT: The NOT operator is similar to the AND operator. The only difference is that the characters will be copied from the original filename to the new filename if they are NOT equal the the character in the same position in the mask. The internal pointer moves the number of characters in the mask
Delete: Select the step number. Enter the number of characters you wish to delete. The internal pointer will move the number of characters to be deleted
REMainder: This is not a step, so there is no step option for it. Simply click either the keep or discard option. This tells RENAMER what you wish to do with the remaining characters in the old filename if they are not all used. (if the internal pointer is not pointing past the end of the old filename) Selecting keep will add any remaining characters to the end of the new filename. Discard will not use them in the new filename.
NO ACTion: Renamer starts with all steps in this position. If you are not using a step (even if you have data entered for it), put the option here, and the step will be skipped. This becomes convienent when you wish to enter instructions for any step and then wish to see what the results would be with and without this step.
Case Sensitive: To the right of the NO Action row are two options for 'case sensitive' (no or yes). This 'case sensitive' option applies to the AND and NOT instructions only. If you select no, the AND and NOT instructions will yield TRUE regardless of whether you enter lower or upper case characters. If you select yes, the case of both the original filename and what you type in (case wise) must match for the instruction to yield true. Top of page screenshot
Renamer uses the standard Windows method of selecting files. Select the OPEN icon or select OPEN from the File menu. Renamer will open to the root of drive C. Navigate to the folder that contains your files that you wish to rename. It is wise to put them all together before running Renamer. Open the folder. To select one file, click it (it will highlight in blue) and then click OK. To select multiple files that are not consecutive, hold down your control key as you click them. To select multiple files that are consecutive, click the first file, hold down your shift key, then click your last file. All the files in-between should be highlighted. (plus the files you clicked) Click OK. The filenames will then be loaded into Renamer, ready for you to do your thing. If you wish to load all files that reside in a particular folder, use the "FOLDER" command. Remember, you can always load all files and uncheck the files you wish to exclude. Top of page screenshot
Can I combine repetitive instructions? Yes you can. Although Renamer does not have a function for repetitiveness, you can repeat instructions repetitively by clicking the process button more than once. If you do not click NEW in-between each PROCESS click, the additional process will be acted on the original filename, but will be added to the end of the new filename. You can even change the instructions and click PROCESS and you will get the same results. Top of page screenshot
Nothing happens when PROCESS is clicked: Check your step selection - you may have neglected to assign the instructions any steps. Also, make sure the checkboxes left of the filenames are checked, Any unchecked filenames will not be processed.
The PROCESS is not what I had intended: Check your steps and make sure the instructions will be processed in the order you want them to be. Click the NEW icon (of File/New) after making adjustments to the instructions and try again.
The links in this document file do not work: You are either using Navigator. or your Microsoft Internet Explorer needs upgrading. Top of page screenshot
Renamer was written to prevent or deal with the most obvious types of errors. Because of the versatility and user control over the operation, it is possible that trapped or untrapped errors may occur. If an error has been trapped, you will receive a message that tells you an error has occurred, along with a description of the error. If the message gives you an instruction you can understand, it will also contain information as to what you need to do to prevent the error. If the message gives you information that you cannot use, then you must look at your application screen to see what might have caused the error. You can cause an error intentionally with Renamer by attempting to rename files with illegal filenames or using logic in the instructions that will obviously cause problems. You should be familiar with the standard Windows rules for renaming files. Renamer does not prevent you from attempting to rename a file illegally, but Windows will intercede and complain. If you do get an error that you cannot solve, feel free to leave me a message using the link at the bottom of this document. Please describe the error message, and events leading up to the error. Remember, support for Rediware software is as close as your keyboard. Top of page screenshot
Rediware Software and the author make no guarantees that Renamer will suit your needs or expectations. Rediware Software and the author are not responsible for any system incompatibilities or file or system corruption due to the installing, usage, or uninstalling of Renamer. Renamer has been tested on several systems without incident, and none is expected. However this disclaimer must be in place should a software conflict arise. Note that the installation software and dynamic link libraries are written by Microsoft and are independent of Renamer. I welcome e-mail on any glitches or bugs that you may encounter. When reporting any bugs, please attempt to recreate the glitch in a step by step fashion so that you can relay to me the exact steps that caused the problem. When installing Renamer, the installation software will detect if you have older versions of dll files and ask you if you wish to install the updated versions. It is recommended that you do so. The versions contained in Renamer are the latest available at the time of release and are official Microsoft-released libraries. Top of page screenshot
UPDATES:
Renamer
updated to version 3.0.0 - 06/02
Some wonderful features have been added
to Renamer 3.0.
You can now load in an entire folder's worth
of filenames without having to select them by using the FOLDER-NEW or FOLDER-USE
option.
Renamer has expanded it's capabilities from
32 filenames max to 500 filenames max using OPEN option or 2000 filenames
max using one of the FOLDER options..
Renamer now has the options to save, load and
delete instruction sets, including the currently working path name, and to
retrieve them at a later date. This allows you to load an instruction set
from the filename you have given it or from the pathname you used for that
set.
Renamer's panel where the filenames are displayed
has been replaced. This new panel will automatically insert a scrollbar if
the number of files exceeds the length of the panel. The checkboxes are now
in the "resulting filenames" column.
The checkboxes (not displayed unless filenames
have been loaded) can now also be controlled by a 'reverse-check' command
that allows for checking all unchecked items and unchecking all checked items.
Great to have when you need to manually edit items due to renaming restrictions.
(see save)
Comprehensive error trapping when saving (renaming
files) Also does not generate errors when files have the same name but have
different extentions.
Added method for putting spaces in your filenames
(by using a period) Note this is only for the 'HARD (insert) entry field.
If editing the 'resulting filenames' field, use spaces as usual.
All formula conventions and the instruction
set has remained the same. If you are used to using a previous version of
Renamer, the good news is there is nothing new to learn!
Renamer
updated to version 2.0.0 - 01/12/02
Added Caps checkbox
Added
Space checkbox
top of page screenshot
Renamer is a Rediware Software and Services release, and Rediware Software and the author retain all rights to the Renamer application, coding, and distribution.
Renamer may be redistributed through outlets of Rediware Software's choosing. If you are in possession of this software, you may not redistribute Renamer unless you obtained Renamer from Rediware Software with both parties having knowledge that distribution is the intent of possession. Top of page screenshot
© Rediware Software and Services, released 2001, 2002
Renamer 3.0 is a full featured
application and will not expire. The unregistered version of Renamer 3.0 has
the same capabilities of Renamer 2.0 plus several new fetures too!
By registering Renamer 3.0 you will be able to process
up to 500 files with the "open" command and up to 2000 files with
the "folders" commands instead of just 32. You will also be able
to use the "Folder" options which will allow you to load an entire
folder of filenames automatically without having to select them. Registration
is free!
You may contact Rediware Software via email: rediware
Visit our website for other software available for free or low-fee: Rediware Software and Services