Rediware Software © 2004, v 1.1.6 2018
Securentry
software was originally designed to be used with custom made hardware designed
and manufactured by WCB Inc. Sadly, the hardware designer has passed away, so
this becomes a do-it-yourself project as of June, 2018. This software package
is dedicated to Bill, my dear friend.
The total package (software and hardware)
enables the user to maintain a secure keypad entry system complete with customizable
access codes, logs of all activity, and the ability to change any aspect of
the system by persons authorized to make such changes. The entire software system
is protected by secure, encrypted information to prevent even a computer-savy
person to access any part of the software without the proper access codes. Practical
uses for the Securentry system include storage rooms, latchkey children, club
houses, or any other area you wish to control access to. The Securentry system
also monitors all usage of the system so you can know who did what, and when.
Unlike most security systems, Securentry does
not require a monthly service charge or fee. Securentry runs from your computer
and is maintained by you, the owner. Software help is free via e-mail. Hardware
service maintenance is no longer available.
This documentation discusses the software aspects
of Securentry. Hardware documentation, if it becomes available, is contained
in a separate document.
Some of the screenshots contained in this document may not appear exactly as they do in the application. Minor changes to the program will cause the text in this documentation to change, and only major changes will cause the screenshots to be updated. You will notice some minor differences.
When Securentry has been installed, you may wish to create a shortcut of the securentry.exe program and place this shortcut in your startup folder. The will insure that Securentry will run automatically when your computer is rebooted. It is recommended (but not required) that you have a dedicated computer to guard your system. A low cost older style computer is sufficient.
Hardware
I have added to this document (June
2018) to provide help with the hardware end as I understand it.
Before your keypad is built or wired, you may
use a gamepad (or joystick) to configure and test this software. I used the
ProPad Blue gamepad, but any multi-button gamepad or joystick, properly installed
should work well. After your keypad is built or wired, you will use the gamepad
port as your keypad port. As detailed below, this software has the ability to
access two gamepads simultaneously (players 1 and 2) and therefore you can have
two keypads if desired.
This software reads the input of the gamepad port
and controls the output of the serial (RS232) port. This means your locking
/ unlocking mechanism must be tied into your serial port. My knowledge stops
here. I do not know what pins are used on the serial port on the hardware end,
or how to connect a locking mechanism to it. I do know the software uses a true
/ false switch. This is where you, the hobbiest comes in.
The initial default of this software configures
the serial port on com 1, 9600, 8,n,1.
Getting Started
Upon the initial loading of Securentry,
you are presented with the main window. This window allows you to see everything
that goes on in Securentry, allowing you to keep an eye on events. It also presents
you with one of two keypad interfaces. The first interface is the software interface
shown in the picture. The second one, of course, is your hardware keypad.
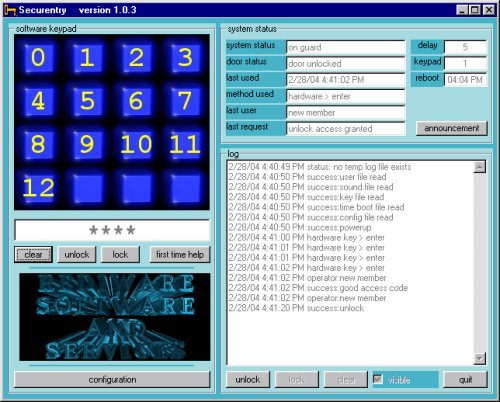
The picture above shows the main window, with some activity going on. The keypad shown can be used in place of the hardware keypad entry. Like the hardware, it expects an access code to be entered. Use your mouse to enter the access code. Each number clicked will be represented by an asterisk in the box below the pad. When a complete and correct access code has been entered, the automatic door lock (installed by your technician) will open and entry can be gained. The door will then automatically lock, after a preset time (designated by you).
The clear button will clear the
entry at any time, allowing you to start over should you decide not to complete
the entire access code for any reason. After a specific time out, predetermined
by you, the partially entered code will remove itself.
The unlock and lock buttons are not being used
in this version.
The 'delay' box displays a countdown when a delay between processes is in action. The 'keypad' box displays the last keypad used. The 'reboot' box displays the time when Securentry will automatically reboot your computer to refresh itself. This is configutrable on the 'auto reboot' tab discussed later.
Because this is a secure system, the starting interface is limited with a small help key. This help key is only for first run users and displays this message:
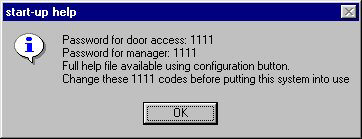
Immediately after installation the door can be unlocked with the access code 1111. All secure areas of the software need to be accessed with a manager's password. Initially this password is 1111. After becoming a bit familiar with the software, you should change these two numbers. They are done on the configuration window which will be discussed below. For security reasons, do not leave Securentry on guard unattended with these codes in place. Change them before using Securentry.
The system status block tells you the last events that have occurred. As you become familiar with all of the actions Securentry can do, you'll begin to see familiar patterns in this block. At a glance you can see the last event that took place.
The delay box is simply an indicator. Some routines have a delay in them, such as the time between your door unlocking and then locking again. All delays are configurable by you, the user. When a delay is in process, this box displays the countdown. You know that Securentry is working correctly at this time even if nothing else seems to be happening at that time. The keypad box is also just an indicator. When a hardware keypad is used, this will display which pad is being used.
The announcement button allows you to play a prerecorded announcement created by you (via a wav file) to all who click it. This can be used for special instructions for employees, children, or members of a club.
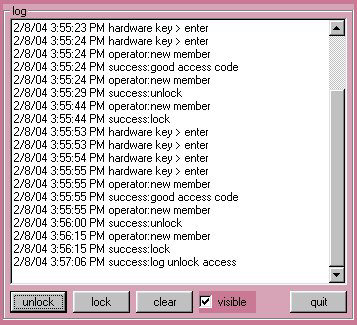
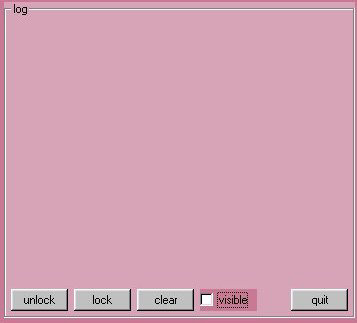
The log block has a few variations. Securentry gives you the option of viewing the first screen of the current log, viewing the entire log, or hiding it completely. You may or may not wish those who enter to view any portion of this log. Normally this log is visible, but only the first screen full The log cannot be scrolled to view the rest of the log without unlocking it. Click the unlock button, and enter the manager's password (initially 1111) to gain access to the rest of the controls. Once the log is unlocked, you can scroll it to view the entire log. You can also clear the current log and start from scratch. If you wish to save parts or all of the log, use the log configuration (discussed below) before clearing. While the log is unlocked, you may elect to make the log invisible by clicking the 'visible' check box to remove the check. It will appear like this:
visible log invisible log
After doing what you need to do, click the lock
button so that further access to the log is restricted unless the manager's
password is entered again.
In mist applications the quit key needs no explanation. In Securentry, you should know that the application can only be ended with the manager's password entered.
Every time I mention 'manager's password' you are probably wondering where that would be entered. It's time to tell. When ever you are about to enter a secure area, you will be asked for this password. A box will pop up allowing you to enter it. Enter the password (initially 1111) and click OK. You will then have access to the restricted area. The box looks like this:

There's one button left that I haven't discussed. It is the configuration button and takes you into another dimension of Securentry. This is the area where all the configuration, maintenance, and decisions are made. Click the configuration button, enter the manager's password to gain entrance, and let's see what lies beyond.
The configuration button, accessed with the manager's password, will open up another window that contains tabs. To enter data and maintain the information contained here, simply click on the tab you wish to work with. I will discuss each of the tabs individually, and describe that they do.
When the configuration window loads, the first tab will be shown by default. The entire window is called the configuration window, and in this window is the first tab, the configuration tab.
The configuration tab
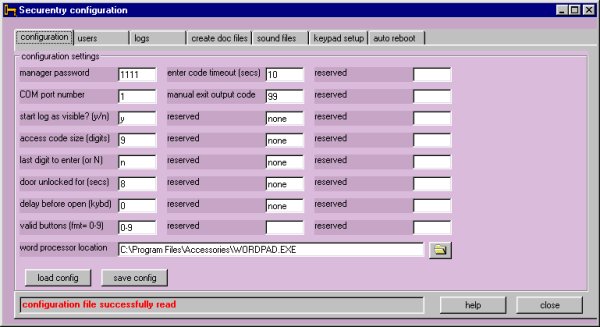
As you can see, some of the entries
are labeled 'reserved.' This is for future expansion, and do not require any
input from you. As Securentry expands to meet future needs, these may become
used. At that time documentation will include text for these areas.
I will briefly describe the input required for
each box. It is up to you to decide what you wish to enter. Note that all tabs
are self-loading. This means that as you select each tab, the appropriate file
will load and fill in the entries that have already been saved. Most tabs also
have a 'load' and 'save' button. If you make changes and then decide you wish
to start over, click the load button, This will load the file again. When you
are finished making entries and wish to make them permanent, click the save
button Nothing is finalized until you save it. If you forget to save changes,
you will be prompted to do so before closing the window. You can also elect
to not save the changes you made. Once you save your changes, they become active
within the program.
manager password: Change your manager password here. Make
sure you remember it! There is no way to retrieve this information if you forget
except to e-mail your configfile.sec file to me via www.rediware.com.
It is also important to change this password before putting Securentry into
action.
com port number: This will normally be set by your installation technician.
If you decide to change the port that your computer uses, you can change it
here. Valid port numbers are from 1 to 4.
start log as visible?: Type a Y here to always have Securentry begin
with the log on the main window visible. If you wish to always start Securentry
with the log invisible, type a N here. You can always change it here, or view
an invisible log by clicking the unlock button (previously discussed) on the
main window.
access code size (digits): Enter here the length of the access codes.
Note that all codes must have the same length. If your access codes will have
8 digits, enter an 8, as shown here. You can have access codes from one digit
(definitely not recommended!) to ten digits long.
last digit to enter (or N): If you wish to have a final digit that all
access codes contain, which tells the system "OK I'm done entering my access
code - check it and let me in", you enter that digit here. This is simply
a different method of code entry. If you wish to have Securentry process in
the normal manner, which is to begin processing when the maximum code size is
reached, enter an N in this box. If you enter a digit from 0 to 9, all access
codes can be extended in length by one. (maximum code length plus the 'enter'
digit). If you have a need to change all codes periodically and do not wish
to assign everyone a new code, you can use this method and change only this
last digit. You can use the digit selected within the access codes themselves
too.
door unlocked for (secs): this is the time delay, in seconds between
the time the door unlocks after entry of a successful access code and the time
the door automatically locks again. This number can be between 1 and 99. The
minimum seconds recommended is 8, which is about one-two seconds longer than
the door open buzzer sound.
delay before open (kybd): When an access code is entered from the computer
by clicking the keypad with the mouse, this number is the delay time before
the door unlocks. This gives time to actually walk over to the door to exit.
This number can be between 1 and 99.
valid buttons (fmt=0-9): This is the range of valid single digits you
wish Securentry to be able to output in the access code range (excluding letters
or extra symbols). There is no limit on the range you can enter here, but it
should consist of the range of numbers on your keypad. If you wish to use a
zero or a nine for a single button exit, then you would limit this range t oexclude
that number. For example, if 9 will be your single button exit number, then
the format 0-8 would be entered here. This prevents someone from using that
single digit exit code to gain entry. The standard keypad capability is 0-9
and you can use all digits and still have a single digit exit button by assigning
it to a combined button and a two digit output code as seen below on the keypad
tab. Although you will enter 0-9 for valid keypad buttons, Securentry can emulate
any character for any button. A bad entry here can cause problems. Your technician
can tell you what this should be, or set it for you. For all standard installations,
this should read 0-9. Be sure to enter the numerical range with a minus
(-) sign between the numbers as shown in the example.(fmt= 0-9)
word processor location: Use the folder icon to locate your word processor.
This will become useful on the 'logs' tab. I recommend using WordPad as your
associated word processor with Securentry. I have used WordPad for testing Securentry's
special logs capabilities and know that other word processors may not give the
desired results. You are still free to select your word processor of choice.
enter code timeout (secs): Enter here the number of seconds you wish
to give someone to enter their access code. This is important because in someone
enters some keys and walks away, Securentry needs to know to clear itself after
a specific period of time so a genuine access code will not be refused.
manual exit key number: This number should be outside or your range of
normal accepted keypad numbers so that it cannot be activated within someone's
access code. It should not lie within the standard rance of 1-8. It is preferable
to use a two-digit number to keep this obvious. This number is selected by you
as a number that, when generated, will simply generate a "single key exit"
entry into the log. This key should be hard-wired to open the door on it's own
rather than have Securentry open it. You can use this for emergency exiting.
Be sure to code this in the keypad tab (described below) for it to work correctly.
The status bar at the bottom of the tab control
will notify you when a file from one of the tabs is read or written. This is
your indication that your read or write was successful.
The remainder of the inputs are reserved for future use.
Don' forget to save the configuration when finished. These values do not become effective until the save button has been pressed. If you do not want to make your entries permanent, do not save and click 'yes' when notified that "you have not saved your configuration file - do you still wish to close this window?" If you wish to start over at any time (before saving) just click the load config button.
The users tab
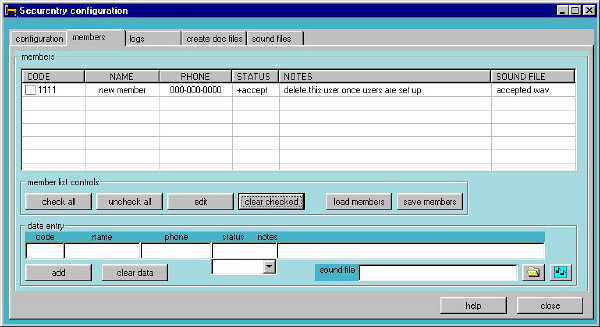
The users tab keeps track of the individuals
who can use or have used the Securentry system. The first thing you should do
is change the default 'new member' to yourself, giving yourself an access code
you will remember, and within the guidelines set up by the configuration and
keypad tabs.
The users list is displayed upon selecting the
users tab. Each user can have a series of items that is attached to that user.
You cannot edit a user's properties directly in the user list, except for the
access code. To edit just the access code, click on the code twice and enter
the new code. Be sure to follow the guidelines you have set up on the configuration
and keypad tabs. The length of the access codes MUST be the same as was designated
in the configuration tab.
To edit the other properties of any user, check
the check box associated with that user and click the edit button. This will
remove the user from the list and bring it down to the edit boxes below the
list. Notice how the information has moved from the list box to the editing
boxes below.
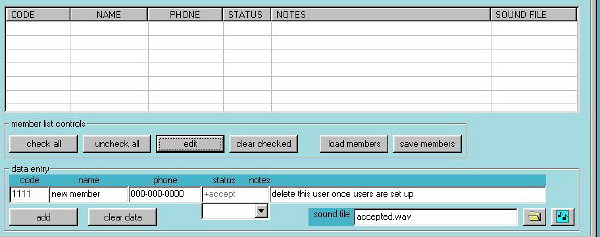
Edit the access code, name, and phone number of the user directly in the edit boxes. You may use any characters for the access code, but they need to be buttons that are visually on your keypad, and have been defined in the keypad setup tab (discussed below). Select a status from the dropdown box. You cannot enter a status directly in the status text box.
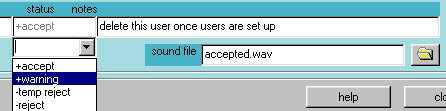
Status items that have a + sign
will admit the user if the correct access code is entered. Status items with
a - sign will be rejected regardless of the code entered. You can temporarily
reject any user by changing the status of the user without having to delete
the user or change their access code.
The notes box can contain any notes you desire.
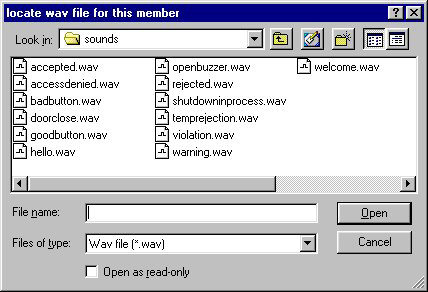
You can select a personal sound file for each
user. This is a sound file that will be played each time the user enters their
code. It may be a musical ditty, a vocal announcement, or can be left blank.
This sound file must be in either wav or mp3 format and reside in the application's
'sounds' sub folder. I will discuss the details of sound files later. To select
a sound file, click the open folder icon, select wav or mp3 in 'file of type'
dropdown, and select a sound file. Then click the 'open' button.
You may hear the sound file after
selecting by clicking the button with the notes on it. If a sound file is selected,
the user who enters the correct access code will hear the announcement sound
file first, followed by their personal sound file, and finally the door buzzer
sound file. The door unlocks with the buzzer sound and not before. Keep this
in mind as files played before should be as short as possible. When all data
is entered as desired, click the add button to add it back into the list.
To add a user, use the edit boxes as described without
bringing an existing user down, and add it when finished. To delete a user,
check it's check box and click the remove checked button. You can also use the
check all and uncheck all buttons for deleting multiple users at one time.
As with the other tabs, the save users will
make your edits permanent. To start from scratch, if you haven't used the save
button, click the load users button to load the original file back in.
The logs tab

The logs tab makes easy work of maintaining the log that accumulates in the log window on the main screen. The log tab consists of two partitions. The left partition contains the currently active log and is taken directly from the main window's log. The right partition is a copy of the log on file stored on your drive. You can edit directly in either partition. Use the buttons in the center to replace, add, or clear a partition. Note the arrow indicators on the buttons. They point to the partition that will be affected. The add and replace buttons transfer data from one partition to the other. Because there are two independent partitions, there are two sets of load and save buttons The currently active log retrieves the data from the main window log, or sends the data in this partition to the main window log. The load and save log buttons load or save the data in the 'log from file' partition from or to the drive. Edits can be undone by reloading the appropriate partition as long as the save button was not pressed. When you have the info you want in the log on the main screen in the left partition, click the 'send to main' button. When you have the information you wish to save in a permanent log file on your drive in the right partition, click the 'save log' button. You can play around with these buttons to get comfortable with them, back and forth. As long as you do not save the results you will not affect anything. This log is simply a record of al activity in Securentry.
create doc files tab
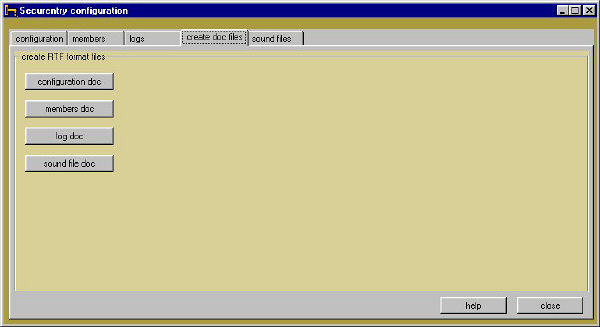
This is an easy tab! At this time there are only four buttons and each button is associated with the files that Securentry uses. Using these buttons is the only way you can view Securentry files with a word processor. This is because the files are stored in encrypted form, and loading them directly into a word processor will look something like this:

This is a security measure. When you use any
of these buttons to view the associated file, it will be loaded into your word
processor as plain text. It is then up to you what you wish to do with the information.
It can be saved as a normal readable file with your word processor, but the
level of security is now in your hands.
The word processor that will be used will be the
one you selected on the configuration tab. I highly recommend using WordPad.
The programming was designed for it, and it is a word processor that every one
has. The results (formatting) may differ that what is intended using another
word processor. Here is a sample of the configuration file in WordPad using
the 'configuration doc' button.

When you are done viewing the file, close your
word processor to return to Securentry.
sound files tab

The sound files tab gives you access to all
the sounds that Securentry uses except for the personal user sound files. As
in most of the other tabs, there is room for expansion. The labels describe
the action, and the sound file (mp3 or wav format) that accompanies it is the
sound that will be played when this action occurs. These files can be changed
or omitted at any time on this screen. As with the user sound file, load the
name of the file using the open folder button. Select to view mp3 files (default)
or wav files. Select the file and click OK. Listen to the file with the notes
button. As with the other tabs, you must save them after editing by using the
'save sound files' button. You can also start over again as long as you haven't
saved them with the 'load sound files' button. It is important to note that
ALL sound files, including the users' personal sound files, must reside in the
application's sub folder called sounds. If it is not located there, the sound
will not play. You can change files in that folder at will, rename them, or
delete them. As long as this screen is current, your files will play at the
time these events occur. If a sound file does not exist for a particular event,
the only thing that will happen is that no sound will play.
When this tab loads, a check is made to see if
the designated sound file exists in the proper folder. If it does, the green
indicator will be bright. If it does not, the indicator will be dull. If you
make adjustments to the sound files to get them in order, clicking the 'refresh
lights' button will perform the check again. In this way you can make sure your
sounds are all active.
Most of the sound files can be in either mp3 or
wav format. The preferred format is the mp3 format as they are more compact.
However, playing an mp3 file requires more overhead within Securentry than playing
a wav file, and therefore wav files are manditory for sounds that coincide with
Securentry's need for a quick response. The three files that can only be wavs
are the first three listed. The default files that come with Securentry are
mp3 files except for the first three. These sounds are timing sensitive, because
Securentry needs to be ready for the next key press or automatic door unlock.
The wav files for these sounds allows Securentry to react much quicker.
Default sound files will be distributed with Securentry. You can use sound files that you find on the web, create your own, or have professionally created sound files for your specific application for a small fee from WCB Inc / Rediware Software.
key setup tab

The keypad setup tab is designed
for the technician who installs your Securentry system. After installing Securentry,
your technician will configure this screen. If you decide to install
the system yourself, you will need to configure this screen for Securentry to
work properly.
The 8 boxes labeled 'keypad common grounds' provides
spaces, 4 for each keypad, to enter the buttons that have common grounds. It
is not necessary for you to enter anything in this area, but only serve as a
reference should your system need service.
The remaining text boxes must be configured for
Securentry to work. The screen is divided into keypad 1 and keypad 2. Any
numbers put into keypad 1 will be designated as an entry key because keypad
1 should be installed on the entrance. Numbers entered into the keypad 2 area
will be regarded as an exit key since keypad 2 (if you decide to install a second
keypad) should be installed at the exit or at the entrance of another door.
The columns under the wired header represents
the hardware end of the keypad. If a single button will be active if it is the
only button pressed (such as 1-8 on keypad 1 above), just enter that button
number in the first 8 rows. If more than one button will be wired together,
enter those button numbers in the wired column in the remaining rows,
such as 24 entered above (wires 2 & 4 wired together), 35 entered above
(wires 3 and 5 wired together), 41 entered above (wires 4 and 1 wired together)
etc on keypad 1. Button numbers must be in the range of 1 to 8. . Note that
there are 8 rows in each frame (one for each keypad) that are separated from
the others. It is not necessary, but it is recommended that single button keys
(a button active by itself) be entered in these spaces. The remaining spaces
can be used if you are wiring multiple buttons together to generate new key
presses.
The bin column is not filled in by you.
In the output column, enter the number
that this key press should be interpreted as. This would normally be a single
digit number, and is the button number you wish Securentry to recognize. Notice
that in keypad 2, buttons 2 & 3 are wired together and the user wishes then
to output a 'button 1.' In all cases you will enter the desired output except
for a special codes, such as the single-digit exit code (which was entered on
the configuration tab). These numbers will be highlighted in yellow. The column
labeled bin is not filled in by you, but by your computer. It is the binary
equivalent of your wired selection.
In the K(eys) column, you must enter the
actual physical key character that will be pressed on the keypad. This is the
character that makes up the user's access codes. You can put in any character
at all. The K character that you enter in the yellow highlighted rows
do not matter. You do not have to enter a K character if the output will
be treated as a special code. Normally these K characters will be numbers,
and usually the same as the output column, and will represent the range of numbers
on the physical pads. However, if you have buttons on your keypad labeled A-Z,
you can actually set access codes to these letters by entering the letters in
the K column.
In the example above, keypad 1 has 8 buttons wired
(1-8). Each button is active if pressed. Pressing the 1 button will result in
a 1 sent to Securentry. Pressing a 2 will result in a 2, 3 will send a 3, 4
will send a 4, etc. You could change this to suit your needs by entering any
digit as the output digit. If you entered an 8 in the output column for button
1, this would result an 8 to Securentry being output.
Example (as above highlighted green): a row
has the entries 41 9 6 A. The user would press the A button on the keypad. Button
A has actual buttons 4 & 1 wired together. Pressing the A button sends a
6 to Securentry for processing. Securentry then looks for an A in the users
access code for validation.
For wiring multiple buttons together, simple enter
all the buttons that are used for each key press in the buttons column. They
can be in any order. As you can see in my example (keypad 1) has buttons 2 and
4 wired together (enter as 24). A 9 has been entered in the output column meaning
that when this button that has 2 and 4 wired together is pressed, have Securentry
read it as a 9. This will bring up a match if a user has a 9 in his access code
because a 9 is also entered in the K column. Buttons 3 and 5 will send a 0,
buttons 4 and 1 will send an A etc. On keypad two, buttons 2 and 3 will send
a 1, 3 and 4 will send a 2 etc. In this way it is possible to have 128 different
buttons from a single port. Securentry allows for 94.
After entering all of the buttons and desired
results, click the calc button. This will put the binary equivalent (in decimal)
in the bin column. This number cannot be edited by you. This will be the number
Securentry will look for during a button press. Click the check button to have
Securentry check your inputs for errors. The check button will flag duplicate
buttons and missing output and key (K) data. There are additional corrections
which will be flagged in succession. As the technician you will have the option
to save the data without correcting the entries. Note that the calc button will
calculate the binary data needed by securentry, the check button will do a calc
first, then the check, and the save button will do a calc, a check, and then
a save. Note that if you elect to save your data without correcting the defective
data, Securentry will halt the check process and do the save.
This tab also has a testing option. Check the
'test' option. Without this option checked, keypresses will be sent to the main
application and not the configuration area! Test your buttons and watch the
results on the boxes under the test option. In this way you can test your wiring
and entries before you make the final installations. The button you press to
test will be highlighted in green, as the above examble shows. To test buttons
wired together with your game pad, press the two buttons on your gamepad together.
It is important to note that while in the test
option phase, Securentry will not activate locks, logs or sounds. The test mode
will automatically shut off when you close this window.
After entering and testing all of your buttons, be sure
to save the entries using the 'save' button. The results do not become active
until you save it, and if you close this window, your edits will be lost.
To reload the original file (last saved) use the
'load' button.
auto reboot tab
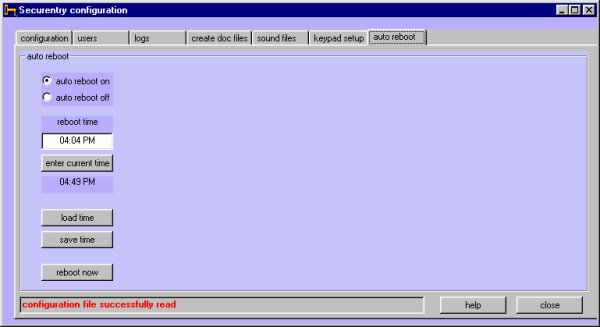
The auto reboot tab lets you configure
your computer system for rebooting itself. This us usually necessary because
computer memory tends to get clogged up over time, causing sluggish responses.
If you do not wish to have your computer reboot daily, click the auto boot off
option. To have your computer reboot daily, click the auto boot on option, and
enter a time for the computer to perform the reboot in the reboot time text
box. Don't forget to save your time when finished.
This example shows a reboot time of 4:04 in the
afternoon. It is suggested that you set this time to a time when your system
can be down for a minute of so, perhaps in the early morning hours.
Click the 'current time' button to have the current
time displayed in the reboot time box. Load a saved time and reboot option with
the 'load time' button. Save the selections with the 'save time' button.
When your computer reboots, your current log (in
the log box on the main screen) will be saved in a temporary file. Be sure to
put a shortcut of Securentry in your startup folder. (see your installation
technician or e-mail me if you are not sure how to do this) When Securentry
restarts after the reboot, the temporary log file will be reloaded and then
deleted. In this way you will not lose your activity information.
Note that Securentry will not be active when your
computer is rebooting.
Credits and rights
Securentry was initially a combined
package with the software by Rediware Software and Services and the hardware
designed by WCB Inc. Rediware Software and the author retain all rights to the
Securentry application and coding. Please do not redistribute this software,
but request others to download a copy from www.rediware.com. A direct download
registers users for software support.
Disclaimer
The authors, designers, and creators
of the Securentry system are not liable for any failure of this system to prevent
unwanted or illegal entry to any area protected by Securentry. This system is
not designed to be used to prevent illegal theft, break-ins, or illegal activity
by determined persons. Securentry is designed to act primarily as a detailed
log for authorized persons and as a deterrent for those unauthorized.
© Rediware Software and Services, version 1.1.3 released 2004, released for public download 2018.
Contacting Rediware Software
If you have questions concerning the operation of this software, the instructions are not clear, or you have any comments at all, feel free to contact me any time.
You may contact Rediware Software
via e-mail: Steve Clarke
Visit our website for other software available
for free or low-fee: Rediware
Software and Services