© copyright
2004 Rediware Software and Services
![]()
Introduction and purpose
Shoplist
provides an easy way to create a comprehensive shopping list that is neater
and easier to read. It also organizes items according to their categories,
making it simple to get all items needed from each specific area of the store
without running back and forth.
Running Shoplist
Shoplist has been tested on Windows 98 only. It should run on Windows 95 without any problems, since the Windows support files are included in this package.
When help is clicked in Shoplist, your default browser will load this file.
Shoplist - the screenshot
this picture in interactive - click a frame
to go directly to the text describing the frame contents
Note: this master screenshot is accurate at the time of distribution. Some
of the clipped shots (below) may have changed in appearance, but the functions
are the same.
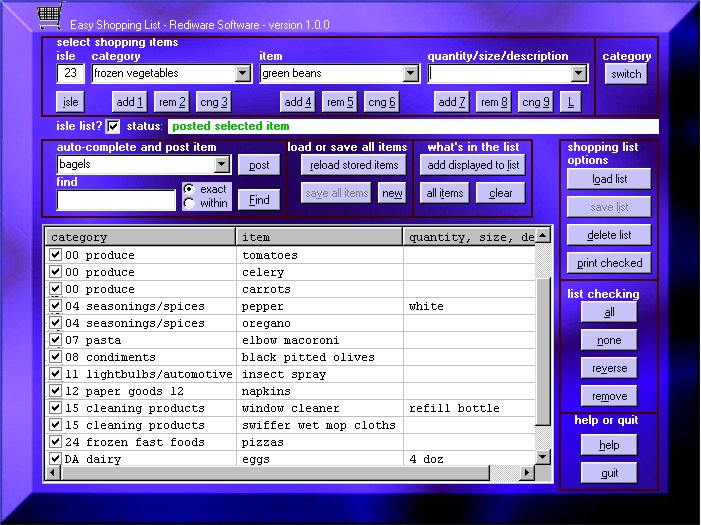
Shoplist - a brief overview
The Shoplist screen above is divided into frames. Each frame contains controls that are related. Each frame has a descriptive header. I will discuss each frame separately. You may click a frame to read about the controls within that frame, or read this document from the top down.
Shoplist maintains two sets of
data. The first set contains all of the possible categories, items, and descriptions
you enter over time. The left drop-down list can contain categories. The center
drop-down list can contain items, with each item assigned to a category. The
right drop-down box can contain quantities of an item, or any other descriptive
text you wish. Each one of these descriptions is assigned to an item.
The second set of data contains your shopping
list, and is added to by selecting data from the first set. The shopping list
has it's own sets of controls for maintenance. Both sets of data can be saved
and loaded from your hard drive, changed, deleted, etc.
Why register? Shoplist is
distributed in trialware form. This means that there are limitations on the
software unless it has been registered. The limitation on Shoplist is that
the shopping list can only contain a limited number of items. To unlock Shoplist,
follow the instructions for registration.
To
register Shoplist, click the register button while Shoplist is running (not
shown onscreenshot above). A registration form will be displayed with several
options. See the form itself for purchasing details.
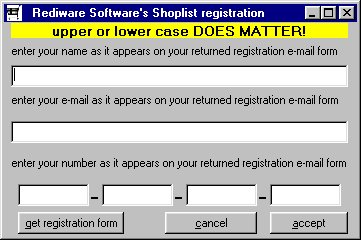
Get registration form: Select this to display the registration form in WordPad All registration instructions are included on the form. Enter your name and e-mail address on the form and print it out. Send the form and a check or money order for $10.00, following the instructions on the form. Send it to the address listed on the form. As soon as your payment is received, you will receive an e-mail with your registration code.
Enter registration: When you receive your registration code via e-mail, click the register button again. A form will appear. Enter your name, e-mail address and registration code exactly as written in your received e-mail. Click the accept button to accept the registration and Shoplist will become complete! (the register button will disappear)
Cancel: If you are not ready to enter your registration, you can close this form with the cancel button.
Select
Shopping Items frame
(go
back to the screenshot)
CONTROLS: 1 2-digit isle text box, 3 drop-down list boxes, 1 isle button, 3 add buttons, 3 remove buttons, 3 change buttons, 1 L (add to list) button

When Shoplist loads for the first time, it will prompt you to load the master items file. I have included one with the program so that you have something to start out with. You will eventually want to either customize this list for your own store(s) or create a new one. You can begin by entering data you wish to use or reuse into this frame, or you can use what is in the default list, and make changes as needed. This frame consists of 3 drop-down lists, 3 add buttons, 3 rem(ove) buttons, 3 cng (change) buttons and a button labeled 'L'.
The first drop-down list contains
the category list. You cannot enter an item or a quantity in those boxes if
nothing is showing in the category list first. To begin, start adding categories
to the category list. Enter the name of the category in the listbox, and click
the add button under the category list box. The cursor will position itself
back into the box where you can add more categories. Examples for a food shopping
list for categories might be bread, meat, vegetables, dairy, etc.
For each category you can also add an isle number
to the category which describes which isle in the store that category of items
is located. This will be a great help in finding items in the store. At first
you may not know which isles contain which categories, and you may wish to
add these later. If and when you use this feature, simply enter the isle number
in the box that corresponds to the category displayed, and click the isle
button to make it permanent. You can change an isle number for a category
at any time simply by entering a new number and clicking the isle button.
If you enter a new category, and enter an isle
number before clicking the add button, clicking the add button will add the
new category and the isle number at the same time.
The second drop-down list is the items list. To enter items in this list, first make sure a category is displayed by clicking the drop-down arrow in the category list box and selecting a category. Then enter the items belonging to that category just as you did when entering categories. Of course you will use the add button under the items list box instead. Examples for a food shopping list in items (assuming you have a category called 'dairy' displayed) are eggs, milk, butter, etc.
The third drop-down list is the quantity/size list box. To enter data in this box, a category must be displayed and an item must be displayed. Set these boxes to display the category and item you want to describe. Then enter data in the quantity/size box. As before, you may enter as many pieces of data as you wish, using the add button under that box to add them to the list. Examples for a food shopping list in quantity/size ( assuming you have dairy displayed as the category, and eggs displayed as the item) are 1 dozen, 2 dozen, etc.
Now you can create a shopping list. Simply select a category, an item, and a quantity/size, and click the 'L'(add to List) button. The item will be added to the shopping list, displayed in the bottom frame. Put your list together in this way. If you need an item that is not appearing in your drop-down boxes and you wish shoplist to remember it in the future, simply 'add' it first. If you wish to add something to your shopping list but do not want shoplist to remember it (a one-time item perhaps) then enter the data in the appropriate drop-down box(es) and click the 'L' button to add it to the list. You do not have to use the 'add' buttons below the drop-down boxes.
The remove buttons are to remove data from the drop-down lists. Make sure the data you wish to remove is displayed. Click the rem(ove) button (associated with the drop-down box that contains the data you wish to remove) to remove it from the drop-down list. When you remove a category, ALL items that are connected with that category are also removed, and all quantities/sizes connected with the items being removed are also removed. When you remove an item, ALL quantities/sizes connected with the item being removed are also removed.
The cng (change) buttons allow you to edit the item itself in any of the drop-down boxes. First, click any drop-down box and select the item you wish to edit, so that it is displayed. Enter what you would like the item edited to in the edit/find textbox, which is the textbox to the left and slightly below the 'switch' button (in the example above, the word 'beans' is displayed). Now click the cng (change) button under the drop-down box you wish to change. The item in that drop-down box will now contain your edited item, replacing the original. All of the items or quantities associated with the original will now be associated with the newly edited item.
The
Status Line
(go
back to the screenshot)
CONTROLS: 1 isle list checkbox, 1 status line label
The isle list checkbox designates
whether the isle number gets sent down to the shopping list along with the
category or not. If you want your list to be organized by isle numbers, check
the box (by clicking it) before creating a shopping list. If not, uncheck
the box (by clicking it again). This state (checked or unchecked)
is saved with your master items list, and will retain it's state the next
time you load Shoplist. If you use isle numbers, the list will be printed
in order of the isle numbers. If not, the shopping list will be printed alphabetically
according to category. When printing a shopping list, a box will precede
the item, providing a space to check off the item when it has been put into
your cart, or write the isle number to be entered into Shoplist.
The status line displays text that describes
the last function completed. This line will also tell you if a function passed
or failed, and what needs to be done should the function fail.
Shopping
List frame
(go
back to the screenshot)
CONTROLS: 1 checkable
list 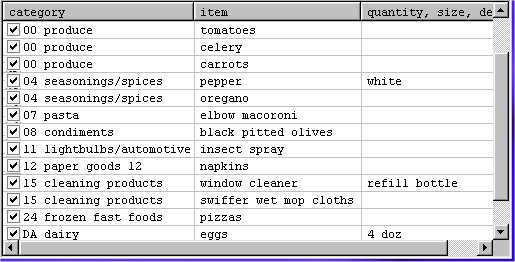
I am jumping to the Shopping List frame because most of the other controls have to do with this list or the drop-down boxes.
When you display a category, an
item, and a quantity/size (you do not have to have all three drop-down boxes
displaying something if you do not wish) and click the 'L' button, the item
gets put into the shopping list. From the example screen shot above, you can
see a list in progress. This list is the list you will eventually take to
the store with you.
The list has several features itself you may
be interested in. You may directly edit category text as it appears in the
shopping list. (you cannot edit the item or quantity/size) You may wish to
do this to clarify an item or even temporarily reclassify an item. This change
will be saved if the list is saved, but does not affect the items in the drop-down
boxes. You may also change the order of the columns in the shopping list.
Simply drag the column header to the desired position. If you do this before
printing, your printout will be in the order you specified on the screen.
Autocomplete
and Post
Edit / Find
textbox
(go
back to the screenshot)
CONTROLS: 1 drop-down
box, 1 post button,
1 editable text box, 1 options selector (exact/within), 1 find button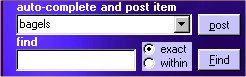
The 'autocomplete and post' controls
utilize one way to locate an item. This drop-down box contains all possible
items. You can drop down the box and select an item or you can begin typing
the item in this box. This box will also use the autocomplete functions to
complete your item text as you type it in the dropdown box if it is found.
When the item is displayed as listed, click the 'post' button to post it to
the main item drop-down box. This does not find categories.
The 'find' text box box is used to enter text
to edit (using a cng button) in a drop-down box. It is also used to enter
text to search for using the find button. I have already described the method
to edit an item in any of the drop-down boxes using this textbox above. (If
you missed it, click here) The 'find' functions are
described below. This box is also used by the program for the 'switch category'
function (as displayed text only).
Instead of hunting through drop-down
listings for a particular item, you can enter the item in the edit/find textbox
(in the example above, the word 'bagels' is displayed - same textbox used
for the 'cng' function described above) and click the find button. If the
text you have entered is found in a category, that category is displayed.
If the text you have entered is found within the items, the item and the category
that contains it will be displayed. You cannot search for quantities or sizes.
There are two options related to the 'find' function. Select the first option,
'exact' to find an exact match. Select the 'within' option to find your text
within the data. As an example, 'cob' would be found within 'corn on the cob'
but would not be found if seeking an exact match.
When a match is found, it will be displayed.
If you wish to look for the next item that would produce a match, simply click
the find button again. Each click will find the next matching item, and will
cycle through the matches again once the last match is found. Each find
will be automatically be posted in the main item drop-down box.
switch
(switch category)
(go
back to the screenshot)
CONTROLS: 1 button

You could read the switch' button
as the switch category' button. Should you decide that an item belongs in
a category other than the one you originally assigned to it, you need not
remove it from one category and add it to another. This would require you
to add all of the quantities/sizes belonging to that item again. Instead,
use this method.
Select a category, then select an item. Click
the 'switch' button to alert the application that you wish to switch the category
of this item. Now select the new category you wish this item to belong to.
Click the switch button again. The selected item will be reassigned to the
selected category. If you are not sure of the steps, watch the status line
for instructions. Note that if you already have an item in the selected category
with the same name, your item's category will not be switched. The status
line will notify you. The find text box is used to display the item. It requires
no editing from you.
List
Checking frame
(go
back to the screenshot)
CONTROLS: 4 buttons
that contain shopping list checking options 
The List Checking frame consists of buttons that check and uncheck the items in the shopping list. You can check the items manually or use these buttons to check large numbers of items. All items in the shopping list remain in the list, but only checked items are printed or removed from the list. If you created a list but wanted to purchase only ones you really need now, you could check them and when printing, only those items would print. To remove an item from the list, check it and then click the 'remove' button.
What's
In The List frame
(go
back to the screenshot)
CONTROLS: 3 buttons

The controls in this frame control what goes into the list. The 'add displayed to list' works exactly like the 'L' button, and adds the displayed category, item, and quantity/size to the list. The 'list all items' button will display everything that you have stored in the category drop-down boxes in the shopping list. This is not meant to compose a shopping list, but is there for easily viewing of your total categories and items. Quantities and sizes are not displayed. The 'clear list' button does just that, completely clears the shopping list display.
List
Files Options frame
(go
back to the screenshot)
CONTROLS: 4 buttons
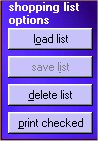
This frame contains controls that
have to do with what appears in the shopping list. If you wish to load a shopping
list you previously saved, select 'load a list.' To save a created shopping
list, select 'save this list.' To delete a previously saved shopping list
from your hard drive, select 'delete a list.' To print the checked items in
your shopping list to a printer, select 'print checked list.'
Loading and saving a list will cause an 'open'
or 'save' dialog box to be displayed. The default filename will be the name
you previously loaded, or the internal default filename if you are doing this
for the first time. You can change the name of any shopping list you save
to another filename, thus being able to store and retrieve any number of different
shopping lists.
Clicking the "print checked list"
will allow you to print out your shopping list in an organized way, listing
all of the items that belong together either by isle or by category. You will
be prompted to enter the name of the store the list is before before printing.
Remember, only the checked items will be printed. To print the entire list,
click the (list checking) "all" button first.
Load
Or Save All Items frame
(go
back to the screenshot)
CONTROLS: 3 buttons
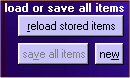
These controls refer to the data
in the drop-down boxes. If you made changes to the data in the drop-down boxes,
you can revert back to your original stored data by selecting 'reload stored
items.' If you made changes to the data in the drop-down boxes and wish to
save the new revised data, select 'save all items.' These controls do not
have anything to do with the shopping list.
Loading and saving items will cause an 'open'
or 'save' dialog box to be displayed. The default filename will be the name
you previously loaded, or the internal default filename if you are doing this
for the first time. You can change the name of any item list you save to another
filename, thus being able to store and retrieve any number of different item
lists. This enables you to create item lists (and shopping lists) for other
products other than food.
The 'new' button clears all items from the
drop-down boxes and lets you start a category-item-quantity list from scratch.
This does not affect the shopping list. You can create different item lists
if you wish in this way.
Help
or Quit frame
(go
back to the screenshot)
CONTROLS: 2 buttons
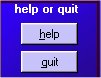
The help button will load this file and the quit button will end the application.
Shortcut keys for all controls are available
The TAB key tabs from one control to the next, setting focus
on that control..
The F4 key drops down a drop-down box if the focus is on that box.
In a drop-down box, the arrow keys rotate the selected text.
Alt and the underlined letter labeling the control activates the control.
The shopping list items can be selected by using the arrow keys when the focus
in on the list. An item can be checked or unchecked with the space bar.
UNINSTALLING Shoplist:
To uninstall Shoplist, got to your control panel and use the Add/Remove utility. Select shoplist for removal. You may get a notice that some components could not be removed. This is because the shoplist application creates files as it runs (the lists you save) After uninstalling, simply navigate to the location where shoplist was installed (default is C:\Program Files\shoplist) and will be there unless you changed the installation location when installing) and delete the folder shoplist including all of it's contents. MAKE SURE you have uninstalled shoplist FIRST!
ADDITIONAL NOTES:
Rediware Software and the author make no guarantees that Shoplist will suit your needs or expectations. Rediware Software and the author are not responsible for any system incompatibilities or file or system corruption due to the installing, usage, or uninstalling of Shoplist. Shoplist has been tested on Windows 98 without incident, and none is expected. However this disclaimer must be in place should a software conflict arise. Note that the installation software and dynamic link libraries are written by Microsoft and are independent of Shoplist. I welcome e-mail on any glitches or bugs that you may encounter. When reporting any bugs, please attempt to recreate the glitch in a step by step fashion so that you can relay to me the exact steps that caused the problem. When installing Shoplist, the installation software will detect if you have older versions of dll files and ask you if you wish to install the updated versions. It is recommended that you do so. The versions contained in Shoplist are the latest available at the time of release and are official Microsoft-released libraries.
CREDITS and RIGHTS:
Shoplist is a Rediware Software and Services release, and Rediware Software and the author retain all rights to the Shoplist application and coding. You may redistribute this software without specific prior consent of Rediware Software as long as the distribution copy is in it's original trialware form. It is illegal to distribute registered copies or authorization codes to make a distributed copy registered.
© Rediware Software and Services, released 2004
Contacting Rediware Software:
You may contact Rediware Software via e-mail: Rediware
Visit our website for other software available for free or low-fee: Rediware Software and Services